
The art of wall mounting your TV will give you the chance to create one of the most significant improvements to your home theatre (outside of getting a new TV or audio system). We’ve already identified the most effective mounting options for TVs. Wall-mounting TVs has many advantages that range from a more aesthetic design to improved ergonomics to allow for more comfortable watching.
It’s also very economical, with lots of options for mounting for less than $100. If you’re using a basic mounting system that tilts or an articulated, dual-arm mounted which offers a range of motions and positions and positions, the fundamentals for mounting that equipment are pretty identical. Also Read: best 65 inch tv under 600
Apart from having a TV and wall, you’ll have to have some things available to properly set up your TV.
RECOMMENDED VIDEOS FOR YOU…
- Paper template (optional)
- Marking tape, pencil or pen
- Tape measures
- Stud finder
- Level
- Drill bit for power drill
- Philips head screwdriver or flathead screwdriver
- TV mount
- Mounting hardware included (screws or spacers.)
It is also recommended to have at the very least a third party to assist. You’ll require an additional couple of people to to lift and place the TV, or perhaps another person to help in getting the positioning exactly right.
Some tips on handling TVs
Learn from someone who has unboxed and put up hundreds of TVs. You require someone else to assist you. While smaller TVs are able to be handled by one person, all TVs that exceed 50 inches must be lifted and moved by two persons.
Even if the weight seems sufficient for a single person however, the shape and size of the TV makes it awkward and special care should be taken to avoid damaging the screen. A damaged TV that is mounted will make the most fun of it. Also Read: best tv for zwift
If you’re handling televisions, you’ll need to be extra careful to safeguard the display. Glass panels that are large or plastic may exhibit some flex however the display technology typically does not. Just a tiny amount of excessive flex or pressure applied to a display can cause irreparable damage to a television beyond repair. (Again I’m quoting an individual who has damaged several TVs through the many years.)
For a proper lifting and carrying of the TV, you need to let the TV’s frame take over the task of supporting the screen. Lift the TV from the lower part of the set while supporting it from the top or sides to ensure that the TV is standing straight, and in the same location it is when in use.
This is the best position for the TV as the chassis is the one that bears all the pressure and weight. Make sure you don’t lean either way or the other, as the thinnest TVs could be slack under the weight of their own enough to cause damage to the screen.
If you’re laying your TV flat, put it down with its screen side down on a wide flat surface that is lined with a clean and soft carpet or blanket. Any objects or other debris can scratch the screen and bezel, so ensure you’re really well-maintained!
You’re looking for a flat surface that can support the all flat front of your TV, and not have uneven sections that might put more pressure on one location, or result in only one aspect of the TV without support.
Be sure to place the TV at its bottom and gently push it forward before lowering it to the smooth surface. Hold both the top corner as well as the middle of the sides so that they can evenly support the TV. You should be cautious not to cause excessive pressure or twisting on the TV’s panel.
Find the perfect TV mount
The first thing to decide on is the correct mounting for the wall of your television. It’s all about two primary factors: the size of bracket your TV can take, and what kind of TV mount works best with your set and the space it’s placed in. Any of the options from our top television mounts list will be suitable for all TVs, but make certain to verify the specifications of your particular TV and requirements with the manufacturer or the instruction manual the unit came with.
Keep in mind that wall mounting a TV might place it at a different position from the seating that you currently have. Be sure to make a plan in advance to place the TV at the right location for the best view.
It’s also important to take out the mount and get familiar with the mount prior to beginning any type of installation or mounting task. Be sure to have the screws you need (both for wall mounting as well as for connecting with the TV) and also that you are aware of what the bracket for wall and the TV mounting plate join to one another.
Find the perfect TV spot
Advertisement
After you’ve decided on the correct wall bracket, it’s time to decide on the ideal spot and place it at the appropriate level. A proper wall placement is crucial when mounting a TV on the wall since your ability to alter the position of your TV afterward will be very restricted even using an adjustable wall mounted. Also Read: best 28 inch smart tv
Find the proper wall. It will be in a central position that has seating. your living space or home theater will allow you to relax when watching shows and movies. Make sure that the wall has access to the power outlets you require as well as any satellite or cable connections.
Place the TV at the proper level, keeping the screen’s center closer or equal to the eye level. (This is why it’s helpful to have a second person to check the angle and comfort while you and another person hold the television.) You can determine the ideal location using the upper left or left corners with a the pencil or masking tape.
Then, take note of the position of the mount with respect with the television. Some TVs mount brackets at the top of the chassis, whereas others are positioned to the side So, make sure you plan your wall mount properly.
How do you mount a TV on the wall
When you’ve got everything you require and mapped out the basic requirements, such as the place you’d like to put the TV, and what the television mount goes together, you’re now ready to put the TV in its place. It’s not difficult however, doing it correctly can make the difference between a stylishly mounted TV, and one that does not be seated correctly or could even damage the TV.
- Find the Studs
After you’ve found the ideal place on the wall you’ll need to locate the studs needed to install the bracket in a proper manner. The mounting of your TV’s wall bracket onto studs will give you the strength required for a TV which could weigh between 30 to 100 pounds. Drywall on its own isn’t strong enough to handle this type of weight, which is why it is essential to anchor your TV’s mount to the studs.
Advertisement
Locating the location of the stud is as easy as using a basic stud finderor other methods to locate the location of the stud. Take a look at the mounting points on the bracket while watching TV to figure out how many studs are required to locate. In most cases the cases, there will be an area of two studs, one on the left and another to the right. The specifics of your walls as well as your selected mounting for your TV, this might require three studs. You can mark the position of the studs on the wall using pencil.
- The hole’s location should be marked.
You’ll then need to mark the exact location where you’ll fix the wall. Ideally, you’ll utilize a level to make sure that the marks aren’t only even between two studs and also to ensure that the measurement isn’t tilted. You can mark the exact areas for pilot holes in the wall with a pencil, or you can apply tape over the desired mounting spot with a template you’ve printed or by marking it up using your own.
- Double check the bracket’s location
After you’ve marked the holes Now it’s time to place the bracket for mounting to the wall. The first step is to place the bracket flat against the wall aligning one screw’s location with the first hole marked. Keep that point in place and firmly in place, turn the other portion of your bracket to align to the next hole. Utilize a level to make sure the bracket is level when aligned to your pilot holes.
Read also about : skyward fbisd
- Drill pilot holes for drilling
With an electric drill, you’ll need in order to create pilot holes in the wall and into the studs at the correct places.
- The wall bracket should be erected
Once the pilot holes have been made, you can utilize the mounting screws included to attach to the bracket. Utilizing a power drill, screwdriver, or ratchet, place into the wall screws to securely attach this bracket on the wall using the screws to go through the studs.
In general it is best to make the screws to be tight enough to keep the bracket securely against the wall with no rattling or wiggling on the mount plate. In the event that the screws have a tendency to sink in the wall or the bracket appears to be shifting by any means, then you are overtightening.
If the wall bracket is set up correctly, you’re nearly done with installing your TV.
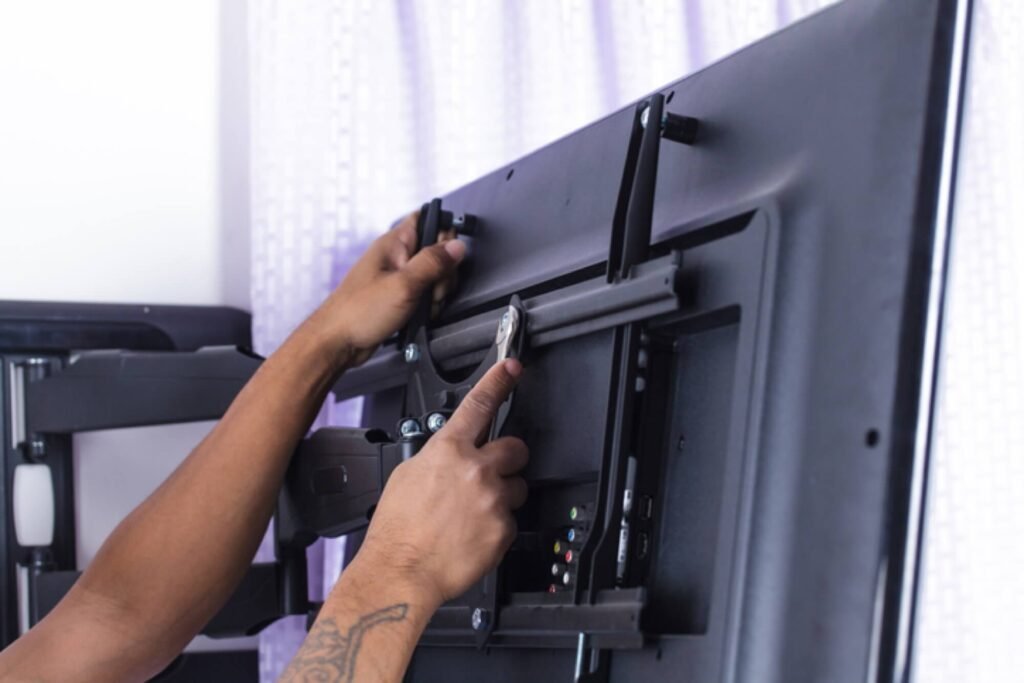
- Connect the TV mounting plate to the
Then, you’ll connect an mounting plate on the back of the TV. The second portion of the mounting plate for the television which is attached to the back of the TV and connect to the wall bracket to put the TV up in the space. Depending on the kind of mount you choose to use the two halves can be connected using clips or rail system or the possibility of an extension arm.
Set the TV’s mounting plate using it’s VESA mounting holes located on the rear of the chassis. Utilizing the screws included that are included with the TV mount, connect this mounting plate on the back of the TV with the screwdriver.
Be careful not to tighten too much the screws, as this could cause damage to the TV’s chassis, or even stripped screw heads and create real problems mounting (or later , removing) the television. The most effective general rule of thumb is tightening the screw to the point that it is holding the bracket in place against the chassis, then tighten it by a quarter turn.
- Attach the TV mount plate onto the wall bracket
Once you have the bracket for wall mounting and the TV mounting plate in place the only thing left to do is to join the two.
Begin by raising the TV up to its proper height at least slightly more than the desired place, so that TV is lowered enough to connect the plate and bracket.
In certain instances it will be a drop-in connector fitted with safety screws that can be tightened upon attaching, while others make use of attachments that can be screwed or clipped into place. It is important to read the directions on the TV mount, and then utilize the hardware that came with it for attaching the bracket to the plate.
Careful in lifting up the television, paying particular attention given to holding the TV using the bezels on the outside, instead of the glass. Be careful not to press or grab on the screen, as this could cause damage to the screen easily.
Once the bracket is connected, you are able to let the bracket hold the weight of your TV.
- Reconnect the TV
The only thing left to do at the moment is to connect the power source to the TV and other devices that may require plugging into. After that it’s time to relax and relax in the new-placed TV.